Categories
Blog

Recovered photos looking “cut off” or “half gray”?

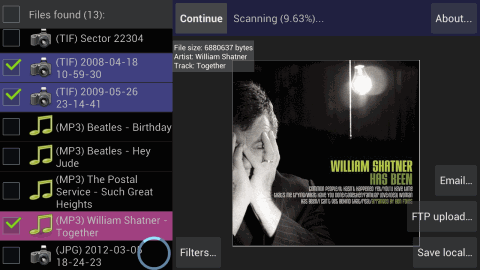
Numerous users of DiskDigger have contacted me regarding recovered photos that sometimes appear to be “cut off” somewhere in the middle, with the rest of the photo replaced by a single “color,” or meaningless shapes and colors, like the picture below. What’s the reason for this mysterious phenomenon? The explanation has to do with file fragmentation.


Files stored on your hard drive (or memory card, USB drive, etc.) are organized using a file system, such as FAT or NTFS. These file systems allow for files to be fragmented, meaning that portions of a single file can be scattered across different locations on the drive. For a quick explanation of why files might get fragmented, refer to the figure below.

When your disk is empty, and you start writing files to it, the files will be stored consecutively (“file 1”, “file 2”, “file 3”, etc.), as we might expect. Now, suppose we delete “file 2”, which would leave a “hole” between “file 1” and “file 3.” And now, suppose we write a new file (“file 4”), which happens to be larger than “file 2” was. A portion of “file 4” will be written into the hole left behind by “file 2”, and the rest of the file will be written to the space beyond all the previous files.


In the above figure, “file 4” consists of two fragments. The sizes and locations of the fragments are indexed in the file system structures that appear at the very beginning of the disk.

So, what are the implications of this when a fragmented file is deleted?

As we know, the act of deleting a file doesn’t actually wipe the contents of the file from the disk. Therefore, we can be sure that the actual contents (or fragments) of the file will remain intact, until they’re overwritten by new data, since the deleted file is now treated as empty space, up for grabs.

However, what happens to the file system structures that keep track of the locations and sizes of the fragments? This depends on the file system:

Under the FAT family of file systems, the fragment locations are recorded in the File Allocation Table, which is the namesake of the file system! The bad news is that, when a file is deleted, its File Allocation Table entries are wiped permanently. It’s still possible to locate the beginning of the first fragment of the file, but any additional fragments are considered lost. In DiskDigger terminology, “dig deep” mode (which relies on file system information) will not be able to recover a fragmented file, if the underlying file system was FAT. It will, however, be able to recover the first fragment of a file. And if that file happens to be a .JPG photo, the image will appear to be “cut off” where the fragment ends.

On the other hand, under the NTFS file system, the fragment locations are stored in the Master File Table (MFT) entry associated with the file. When a file is deleted in NTFS, its MFT entry gets marked as “deleted,” but the entry itself is not wiped, so its fragmentation data remains preserved. As long as the MFT entry is not overwritten by a new file, it’s possible to recover the original file in its entirety. In DiskDigger terminology, “dig deep” mode may be able to recover a fragmented file from an NTFS file system, as long as the file’s MFT entry, as well the actual contents, haven’t been overwritten by new data.

And what about “deeper” mode in DiskDigger? Let’s recall that “deeper” mode disregards the file system altogether, and thoroughly scans the entire disk for the presence of files. The problem is that, in the case of .JPG files, DiskDigger can only detect the beginning of the file, since only the beginning has a unique byte signature. So, once again, if the detected .JPG file is fragmented, we’ll only be able to recover the first fragment, since the other fragments don’t have a unique signature.

To summarize, the reason that certain recovered photos may appear “cut off” is that the .JPG file was fragmented, and only the first fragment could be recovered. The only way that DiskDigger can currently recover fragmented files is in “deep” mode, and only if the underlying file system is NTFS. If “deep” mode does not produce the desired results, then the only alternative is to use “deeper” mode, and settle for incomplete or “cut off” images.

It’s also worth mentioning that other data recovery tools similar to DiskDigger have the same limitations. There is ongoing research regarding recovery of fragmented files without referencing the file system, and eventually certain methods of recovering such files may be built into DiskDigger. Stay tuned, as always.

Categories
Blog

DiskDigger Pro for Android!

I’m pleased to announce the release of DiskDigger Pro for Android! This new version of DiskDigger is capable of recovering (carving) over 20 different types of files from your Android device’s internal memory, or an external memory card. This includes support for .JPG photos, .MP3 and .WAV audio, .MP4 and .3GP video, raw camera formats, Microsoft Office files (.DOC, .XLS, .PPT), and more!

As with the non-Pro version of DiskDigger for Android, this app requires root privileges on the Android device. The non-Pro version of DiskDigger will remain available (for free!) on the Google Play store, and can still be used for recovering .JPG photos.

So what are you waiting for? Go to the Google Play store on your Android device, and install DiskDigger Pro today!

Categories
Blog

The problem with recovering text files

This is a question I get a lot, so I thought I would expand on it more formally: “Why can’t DiskDigger recover plain text (.txt) files in ‘deeper’ mode?

To begin, let me remind everyone that DiskDigger can recover text files in “deep” mode, where it scans the structure of the file system and recovers files based on clues provided by the file system. This makes “deep” mode capable of recovering any type of file, including text files, while only being able to recover these files from a healthy file system.

However, in “deeper” mode, things are very different. Since DiskDigger no longer relies on the file system to parse the structure of files on the disk, it can only detect files based on byte sequences known to exist in certain types of files.  For example, all PNG image files begin with the byte sequence 89 50 4E 47. Therefore, DiskDigger can look at every sector of the disk, and if it begins with this sequence of bytes (files must be sector-aligned), it knows that there’s a PNG file at that location.

The same is true for many other types of files, like .JPG, .DOC, .MOV, etc.  It’s also true for files that are built from text, but have a consistent structure, such as .HTML, .XML, .RTF, etc.

So now we come to the problem with pure text files. Unlike other types of files, text files do not contain any identifiable sequence of bytes. They only contain… well… text!  There’s no underlying binary structure.

This makes it nearly impossible for DiskDigger to “pick out” a text file from all the other random content on a disk.

Despite all this, there are a few remote possibilities for recovering text files which are an active area of development in DiskDigger. None of these are perfect, but they may eventually lead to a solution for recovering some text files:

  • Some text files may be encoded in Unicode (specifically UTF-16). In this case, the text file will have a starting byte signature, which is either FE FF or FF FE. Unfortunately this signature is far too short to meaningfully identify UTF-16 files, and will produce too many false positives.
  • Since many text files are encoded in ASCII or UTF-8, and written in English, we can expect them to contain only characters between 0x20 and 0x7F (along with \n and \t). We can then perform a statistical analysis on each sector of data, and if it contains mostly characters within our desired range, we can consider it to be part of a text file. There are several problems with this approach, however:  we won’t be able to determine the size of the detected text file, and we won’t be able to tell where one file ends and another begins (if there are two text files next to each other on the disk). Also, since this is a statistical method, it will surely produce false positives, as well.
  • Some text files do have some semblance of structure in them, in the sense that they have an identifying signature, but not in a consistent location. For example, most C and C++ source files have the word “#include” somewhere near the beginning. By searching an entire sector for this kind of signature (independent of offset), we can be somewhat certain about the presence of a particular file. This kind of functionality is actually already built into DiskDigger’s custom heuristics feature. This method, however, still has the problem of not being able to detect the size of the recoverable file.

As discussed above, it’s generally not feasible to recover plain text files, because they have no discernible binary structure.

It is, however, possible to recover a text file using custom heuristics, as long as you know an exact sequence of letters that is certain to appear near the beginning of the file.  I will write a short tutorial on performing this task in a future article. Stay tuned!

Categories
Blog

Recovering QIC-150 tapes: a case study

A friend of mine recently found something very intriguing:  several backup tapes from his old Amiga 500 computer from around 1995.  Since he no longer has the original Amiga machine, he no longer has a way of reading the tapes, and thus no way of rediscovering the old documents, letters, or any other memories that were lost when the old computer was thrown away.

Without hesitation, I offered to help recover the data from the tapes, not only for the challenge of it, but also because I have never dealt with Amiga computers or Amiga-formatted media, and this would be a great opportunity to familiarize myself with a significant part of computing history, even if it has already come and gone.  This is a brief chronicle of the steps I took to recover the data, just in case someone else in the future (including myself) needs to perform a similar task.

One of the most pleasurable aspects of this experience was how easily everything came together, owing mostly to the abundance of information on the web regarding every step of these kinds of processes. Hopefully the information in this article will contribute to that abundance.

The tapes were QIC-150 cartridges (specifically Sony D6150). After rummaging a bit through my attic, I realized that I actually own a tape drive that’s capable of reading QIC-150 tapes. The drive is an Archive Viper 2150S, which uses a SCSI interface:


Since the drive is SCSI, I would need a SCSI host adapter card to interface with it. Luckily, after rummaging a bit more, I found an Adaptec AHA 2940UW adapter which looked like it would be perfect for the job:


I installed the adapter into an old PC that “still” has a PCI bus (how far we’ve come!), connected the drive to it with a 50-pin SCSI ribbon cable, and put a terminator on the end of the cable (I could have also used 8-pin SIP resistors for which the drive has sockets).  The jumpers on the drive were already set to have a SCSI ID of 0, so I didn’t have to make any physical changes to the drive or the adapter.


I booted up the PC, and was happy to see that the Adaptec card was correctly reporting the Viper 2150S as being connected with an ID of 0. So far, so good!

The computer booted into Windows XP, and at this point I encountered one of the very few hiccups in the whole process:  Windows XP does not have a driver for the Viper 2150S drive. Apparently Microsoft discontinued support for it after Windows 2000.  That was perfectly fine, since my next instinct was to boot into Linux (I simply used an Ubuntu 12.04 live CD).

Within Linux, the tape drive worked perfectly.  I inserted the first tape, and typed the command to rewind the tape to the beginning:

$ sudo mt -f /dev/nst0 rewind

The drive obeyed without any errors! So then, I decided to go for all or nothing:  I issued the command to simply dump the entire contents of the tape to a binary file:

$ sudo dd if=/dev/nst0 of=tape1.bin

The drive started whirring, and I watched in amazement as twenty-year-old technology was working flawlessly in the world of the future. After a few minutes, the data dump was complete, and I had a pristine image of the data from the tape. I repeated the same process for the other tapes, which also had zero issues or bad blocks. Three cheers for Sony for developing such a sturdy medium for storage, and to the owner of the tapes for preserving them so well.

After reading the binary images of the tapes came the next hurdle: How is the data formatted?  Tapes do not have a “file system” like hard drives do, so the data on the tape is entirely application-specific. In order to make sense of the data, we would need to know the precise application that was used to write it!

Here’s what we know about the data from the tapes:

  • It’s from an Amiga system
  • It’s from around 1995

The owner of the tapes did not remember which software he used to make the backups, but we could assume that it was probably a “common” backup application at the time.  After some searching around the web, it became clear that the most common backup tools for Amiga at that time were Ami-Back, Quarterback, and Diavolo.

The next step was to set up an emulated Amiga environment, so that we could run the original Amiga software to restore the backups.

The de facto solution for Amiga emulation is WinUAE, which is a very impressive and virtually feature-complete emulator.  In order to work properly, WinUAE requires a ROM image (referred to as “Kickstart” in the Amiga world). After that, it can run bootable Floppy images for Amiga, or a bootable Amiga hard drive (with AmigaOS loaded on it) that can be mapped to any Windows folder. (the ROM image and the AmigaOS files are the only semi-difficult things to obtain; beyond the scope of this article)

I found an extremely helpful step-by-step guide for installing AmigaOS 3.9 under WinUAE.  To my surprise, I also found a vibrant and thriving community of Amiga users who are willing to help find and share old software.

In no time at all, I had a fully-operational AmigaOS system, ready to attempt some trial-and-error methods of restoring the backup files.

My plan was the following:  I would install all three of the most common backup tools for Amiga (Ami-Back, Quarterback, and Diavolo), and use each one to make a test backup.  I would then compare the binary format of the test backups to the tape images.  With any luck, one of the binary formats would match up.

And, lo and behold, the backup from Ami-Back was a match!  So now, knowing that Ami-Back was the correct utility, I mounted one of the tape images as a hard drive in the emulator, and used Ami-Back to “restore” from it.  It worked like a charm. The files poured out of the backup image, as I watched, yet again, in amazement.

It was a complete backup of the entire Amiga system from 1995. Since I had already set up the emulator correctly, I was able to make it boot directly from the restored system image. In effect, I was able to see the screen of the computer, exactly as it would have been seen nearly twenty years ago:

Categories
Blog

DiskDigger 1.5.5.1507 released

The latest version of DiskDigger is now available for download! Go to the DiskDigger website to check out the new features and download the updated program.

Categories
Blog

Welcome to the new site!

Welcome to the new website of Defiant Technologies, LLC!  This site will serve as a medium for us to share news about the company, new services we’re providing, and new products we’re developing. Feel free to look around!